BASICS EFFECTS
When we see a dazzling visual effect on screen, it's usually the result of great expertise coupled with lots of hard work. Most pre-packaged or "off-the-shelf" visual effects by necessity have a sameness to them that makes them less appealing.
Premiere comes loaded with a multitude of ready-made effects, but most of these are at best diverting and at worst distracting. We are therefore going to concern ourselves here with only the most basic of effects. These transitions have been part of the language of motion pictures for the past century. Even so, they should be used with care, consideration and moderation.
Premiere comes loaded with a multitude of ready-made effects, but most of these are at best diverting and at worst distracting. We are therefore going to concern ourselves here with only the most basic of effects. These transitions have been part of the language of motion pictures for the past century. Even so, they should be used with care, consideration and moderation.
GETTING STARTED
There is a tab on the project panel labelled effects. Clicking on this tab reveals the effects panel. As you can see, all effects— whether for picture or audio— are housed here.

FADE IN/FADE OUT
In the digital age, the terminology regarding effects has become garbled. Traditionally, a fade effect involves an image either emerging from black [fade in] or disappearing into black [fade out]. In Premiere, fade ins and fade outs are folded into a variety of effects that it collectively calls dissolves. Let's explore this family of effects by first making a fade in.
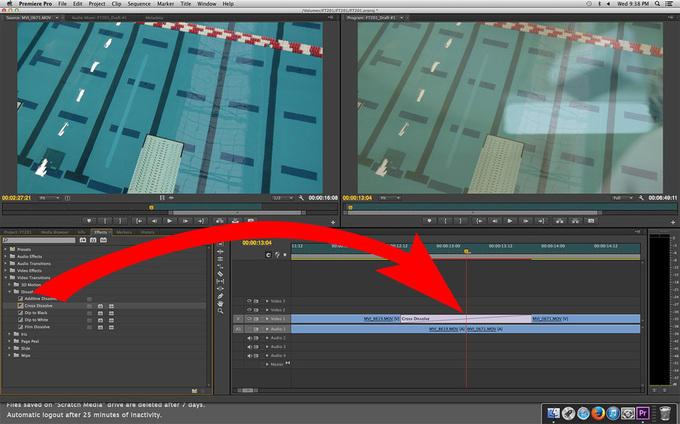
We start by opening the Video Transitions folder in the effects panel. Next, we open the Dissolve folder. Here, we'll find the Cross Dissolve effect.

To make a fade in at the start of our sequence, we first position the playhead to the far left on our timeline. Then we simply drag and drop the cross dissolve effect at the head of the picture track as shown.

Here we see the standard dissolve that has been created. Since there is no picture preceding this clip, the image will fade in. The duration of the effect is one second— the default setting for Premiere.

Its easy to adjust the duration of the effect. Just activate the [selection] tool in the vertical menu, then click on the dissolve and drag it forward or backward to make it longer or shorter.

DISSOLVES
Traditionally, a dissolve refers to an effect where one image blends into another. Again, Premiere uses the term much more loosely. In any event, here is how we would make a traditional dissolve effect.
Here we have positioned the playhead directly between two shots on the timeline.

Once again, we open up the effects panel and navigate to the Cross Dissolve effect in the Dissolve folder. When we drag and drop the effect at the playhead in the timeline, a dissolve is created, blending the two shots. As before, we can adjust the duration of the effect by using the selection tool.
To remove an effect, simply use the selection tool to select the effect in the timeline. Once the effect (and only the effect!) is highlighted, hit the [delete] key to remove it.
Click here to proceed to the next section of this editing guide.
