
A STEP-BY-STEP GUIDE TO SHOOTING WITH THE CANON EOS-M CAMERA
The Canon EOS-M is a high-performance, interchangeable-lens digital camera. In still mode, it can take pictures with a resolution of approximately 18 megapixels, and it can shoot video in full high-definition.
Here is an overview of the parts of the camera:
Here is an overview of the parts of the camera:

a. Grip
b. Lens Mount
c. Lens Lock Pin
d. Lens Release Button
e. Mirror & Sensor
b. Lens Mount
c. Lens Lock Pin
d. Lens Release Button
e. Mirror & Sensor

f. LCD Monitor/Touch Screen
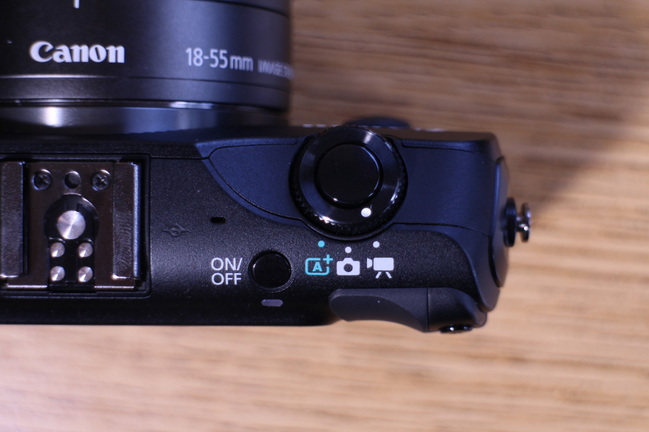
g. Power/Access Lamp
h. Movie/Start Stop Button
i. Menu Button
j. Playback Button
k. Quick Control/Setting Button
l. Main Dial
m. Info Button
g. Power/Access Lamp
h. Movie/Start Stop Button
i. Menu Button
j. Playback Button
k. Quick Control/Setting Button
l. Main Dial
m. Info Button

n. Mode dial
o. Shutter button
p. Power Button
q. External Audio Mount
o. Shutter button
p. Power Button
q. External Audio Mount

r. Battery/SD Card Compartment
s. Tripod Socket
s. Tripod Socket
SETTING UP THE CAMERA
INSERTING THE BATTERY & SD CARD
Before powering on the Canon EOS-M you have to insert a battery and an SD Card.
Before powering on the Canon EOS-M you have to insert a battery and an SD Card.

Push the latch on the bottom of the camera

Release the door to the empty battery compartment

Insert battery & SD card. DO NOT FORCE THEM IN. Both should easily click into place when properly inserted. Close compartment door.
POWERING ON THE CAMERA

Locate the on/off button on top of the camera. Press to turn on.
MENU FUNCTIONS

To access the menu function in the Canon EOS-M press the red MENU button on the back of the camera.To toggle between menu options rotate the scroll wheel or use the touch screen function and simply press the option you are trying to access.
FORMATTING THE SD CARD

To format the SD card, press the menu button, then use the scroll wheel to toggle to the first yellow wrench. Click down on the scroll wheel to select [Format Card] and press the Set button.

When prompted, TAKE A MOMENT TO HEED THE WARNING: once formatted, all data previously recorded on the card will be lost. To proceed with formatting, use the scroll wheel to toggle right and select OK.
SETTING MANUAL FOCUS MODE
In order to exercise control over what's in focus in our pictures, we need to shoot in manual focus mode. To do this, we start by going to the MENU. Next--

Use the scroll wheel to toggle to the second red camera icon. Click down on the scroll wheel to highlight "Focus mode." Click on the SET button.

Toggle to "MF" option and press the SET button.
SETTING CUSTOM WHITE BALANCE
All light sources have a characteristic color. When we set the white balance, we're instructing the camera to see a particular light source as white. The most accurate way to do this is to use the custom white balance setting.
To start the white balance process, take a picture of a white piece of paper. Just fill the screen with the blank white surface, making sure to avoid shadows and uneven lighting. The paper should be photographed under the same lighting and exposure conditions that will apply to the photos you are about to take.
Go to the MENU

Use the scroll wheel to toggle to the 4th red camera icon. Highlight "Custom White Balance" and press SET.

The picture you took of the white sheet of paper should appear on screen. Press SET to use this as the white balance reference. A prompt will appear saying "Use WB data from this image for Custom WB." Toggle to OK and press SET. Note the Custom White Balance icon in the red square. When done, exit to viewing mode by pressing the MENU button.
To insure that you are actually using the Custom White Balance setting, touch the [Q] icon in the upper right corner of the screen. Touch the Custom White Balance icon to activate that setting. Finally, touch the return arrow to get back to regular viewing mode.
SETTING THE SHUTTER SPEED
The shutter speed controls the duration of each exposure. A slower shutter speed will let in more light, but it may produce a blurry image.

To adjust shutter speed, touch the window [a] in the lower left of the screen.

A numbered scale will appear on screen. Slide your finger along the scale to select the desired shutter speed. 1/60th of a second— the speed selected here— is a medium speed, neither slow nor fast.
SETTING THE F/STOP
The f/stop adjusts the amount of light transmitted through the lens. The f/stop function will only appear while in manual mode. Though it is an exposure control, the f/stop setting has a noticeable effect on the range of focus (depth of field).
Setting the F/stop is done in much the same way as setting the shutter speed.
Setting the F/stop is done in much the same way as setting the shutter speed.

Touch the window [a] at the bottom of the screen, then use your finger to adjust f/stop by sliding along the numbered scale [b] to select your f/stop.
SETTING THE ISO
The ISO setting controls the sensitivity of the camera sensor. The higher the ISO, the more sensitive the sensor, meaning less light is needed to make an image. As a rule, we use low ISO settings in bright settings and high ISO settings in settings with low light levels.
Setting the ISO is done using the same system as used for shutter speed and f/stop.
Setting the ISO is done using the same system as used for shutter speed and f/stop.

Touch the window [a] at the bottom right on the screen, then use your finger to adjust ISO by sliding along the numbered scale [b] to select your setting.
THE CAMERA IN VIDEO MODE
Turn the mode dial on top of the camera to the movie camera icon.

Touch the movie camera icon [a] in the upper left of the screen.

Select manual mode by touching the [M] camera icon.
ADJUSTING SHUTTER F/STOP & ISO IN VIDEO MODE
Controlling these functions in video mode is the same as when taking still pictures. You may adjust f/stop and ISO as needed, but as a rule you should not change the shutter speed while recording in video mode.

SHUTTER SPEED IN VIDEO MODE SHOULD ALWAYS REMAIN AT 1/50TH OF A SECOND.
RECORDING VIDEO

To record video, press the red button [a] on the back of the camera. A red dot [b] will show up on screen to indicate that recording is underway.
THE LENS
There are two rings on the lens that can be adjusted manually. Simply turn the rings on the lens barrel.

The outer ring [a] controls focus; the inner ring [b] controls focal length.
You can use the focus ring to "pull" focus— to shift the point of focus in a shot from one subject to another. Adjusting focal length changes the framing. One end of this adjustment gives you a wide angle perspective; the other end gives you a zoomed-in, telephoto view.
