SEQUENCE EDITING IN THE TIMELINE
There are two types of edits: the insert edit and the overwrite edit. To understand the difference between the two, let's set up to cut a shot into our timeline.
We've selected some source material to edit into a sequence. Note the selected material from the medium shot of the diver in profile in the source window. Note also the sequence in the timeline. We have positioned the playhead on the sequence in the timeline so that it sits in the middle of close-up of a frontal view the diver.
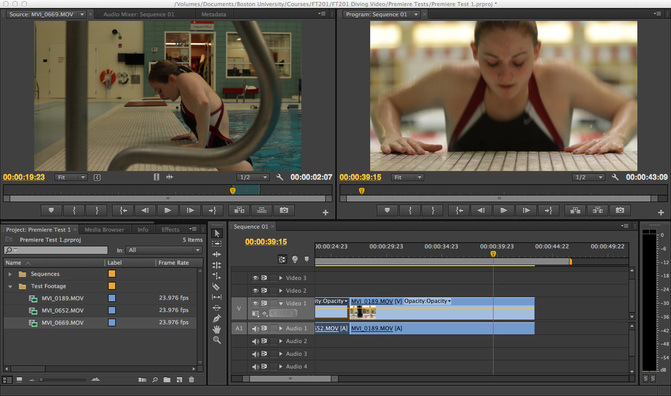
Here's what happens if we make an overwrite edit: the new material from the medium shot covers up the material on the timeline. As you can see, the source material is covering up— or "overwriting"— some of the close-up.

Now consider the insert edit. In this case, the incoming material gets inserted at the point selected on the timeline. Instead of covering up the material from close-up, that footage gets pushed to the right or "downstream."

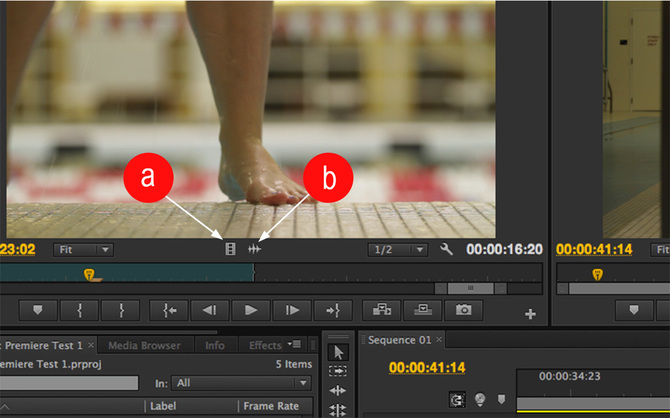
Whether making an overwrite or insert edit, we set up to make the cut the same way: We position the playhead in the timeline [a] where we want the new shot to start. We mark the in and out points on the source material [b], and we make sure that we have targeted source track indicators to the correct tracks on the timeline [c].

There are several controls that can be used to make edits, but one method that's easy to spot is right on the source window dashboard. Here we can see the buttons to make an overwrite edit [d] and an insert edit [e].

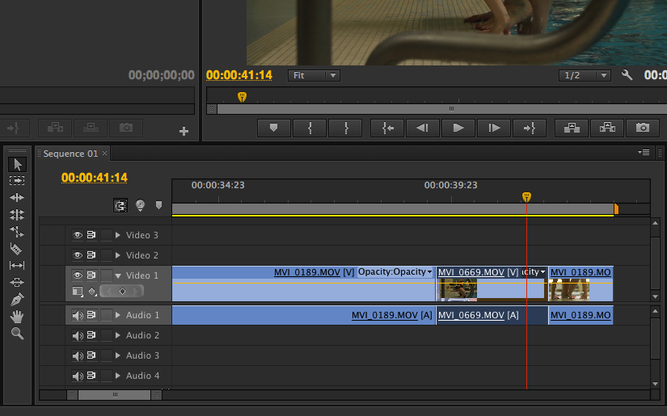
Insert and overwrite edits can also be made by dragging and dropping the source material into the timeline. When you drag and drop, you will make an overwrite edit by default. However, if you hold down the [ctrl] (Windows) or [⌘] (Mac), you will make an insert edit. Note the sawtooth line at the edit point on the timeline in this example. This indicates that we're in insert edit mode.

You can use the selection tool to adjust a clip once it is in the timeline. Activate the selection tool, then click on the clip and drag the it left or right to make it longer or shorter. In this example, we have shortened the clip by dragging it to the left. The amount we add or subtract is shown in a little dialog box on the timeline. Here, we have taken one second and six frames off the tail of the clip.

SELECTING A CLIP OR A RANGE OF CLIPS
The simplest way to select a clip in a sequence is to click it using the Selection Tool. Be careful not to double-click or it will open in the Source Monitor. Holding the [SHIFT] key while you select will allow you to select or deselect additional clips.
You can also select multiple clips using the lasso function. Click on an empty part of the timeline and then drag to create a selection box.

SELECTING AND MOVING A TRACK
Suppose we want to move an entire portion of our sequence. An easy way to do this is to use the track selection tool. To select every clip on a track, simply click on the Track Select Tool (Keyboard Shortcut [A]). Now click on any clip on the track of your choice. The entire track until the end of the sequence will be selected. If audio and video are synced together, the video and audio will be linked and move as one unit.
Activate the track selection tool in the vertical menu [a], then click on a track and drag the material left or right. In this example, we're moving a portion of our sequence to the right [b]. Note that only the material starting at the playhead position gets shifted.

Here is what the tracks look like once we have finished dragging and dropping the selected material.

LOCKING AND UNLINKING TRACKS
Any track can be locked to prevent inadvertent edits.
To lock a track, just click the box next to the track header [a]. Note that the locked track [b] becomes highlighted with crosshatching.

Very often, we want to edit picture and audio tracks separately. As we have seen, when a clip comes with sync sound, Premiere will edit picture and audio together by default.
To add only picture from a source clip, click on the [picture] icon [a] in the source panel prior to making the edit. To add only audio from a source clip, click on the [audio] icon [b] in the source panel.
Even if you have edited audio and picture together into your sequence, it's easy to separate them so that each track can be edited independently.
Using the selection tool, click on the audio/video clip you would like to separate [a]. Right-click, and a menu will appear. Select [unlink] from the menu [b]. Now you will be able to select and manipulate the audio and video in the selected clip independent of one another.

REMOVING CLIPS FROM THE TIMELINE
Let's say we want to delete a clip from our timeline. There are two basic ways to do this: lift and extract.
In this example, we're going to remove clip [a] from the sequence in the timeline.

Using the selection tool [b], we click on the clip. Note that now the selected clip [c] is slightly darker than the rest of the timeline.

We're going to use a keyboard shortcut to mark in and out points at the head and tail of the selected clip. We do this by simply pressing the [/] key. Press [/] and— presto!— in and out points [d] are applied to the clip.

Now let's try the lift option. If we click on the [lift] button [e], the selected clip is deleted and a hole is left in its place on the timeline.

Here's the extract option. In this case, we click the [extract] button [f]. Note how the clip is once again deleted, but now, instead of leaving a hole, the shots on either side of the deleted clip have been cinched together.

There are usually several ways to perform a given task in Premiere. Lifting and extracting are good examples. Here's an alternate way to lift a clip: Use the selection tool to select the clip, then press the [delete] key. To extract a selected clip, hold down the [option] key and press [delete].
SPLITTING A CLIP IN THE TIMELINE
Sometimes when you add a clip to a sequence you realize that you need to divide it. Perhaps you want to remove a section of the clip, or you want to separate the beginning and end to make space for a new clip. There are two ways to split a clip.
The first method uses the razor tool. Click the [razor] button in the vertical menu [a] and then simply click the point on the clip [b] where you want to it to be divided.

Here we can see that the single clip has been split into two parts at the point where the razor tool was applied.

Here another method for splitting a clip. Use the selection tool to select the clip you want to split. As always, the selected clip in this example is darker than the rest of the timeline.
Now we'll use another keyboard shortcut. Type [ctrl] (Windows) or [⌘] (Mac) + the [k] key. The clip again is split, but note one slight difference: in this case, the split occurs where the playhead is located within the selected clip.

Click here to proceed to the next section of this editing guide.
